How to Make a frame for your TV (Samsung Frame, 55 inch)

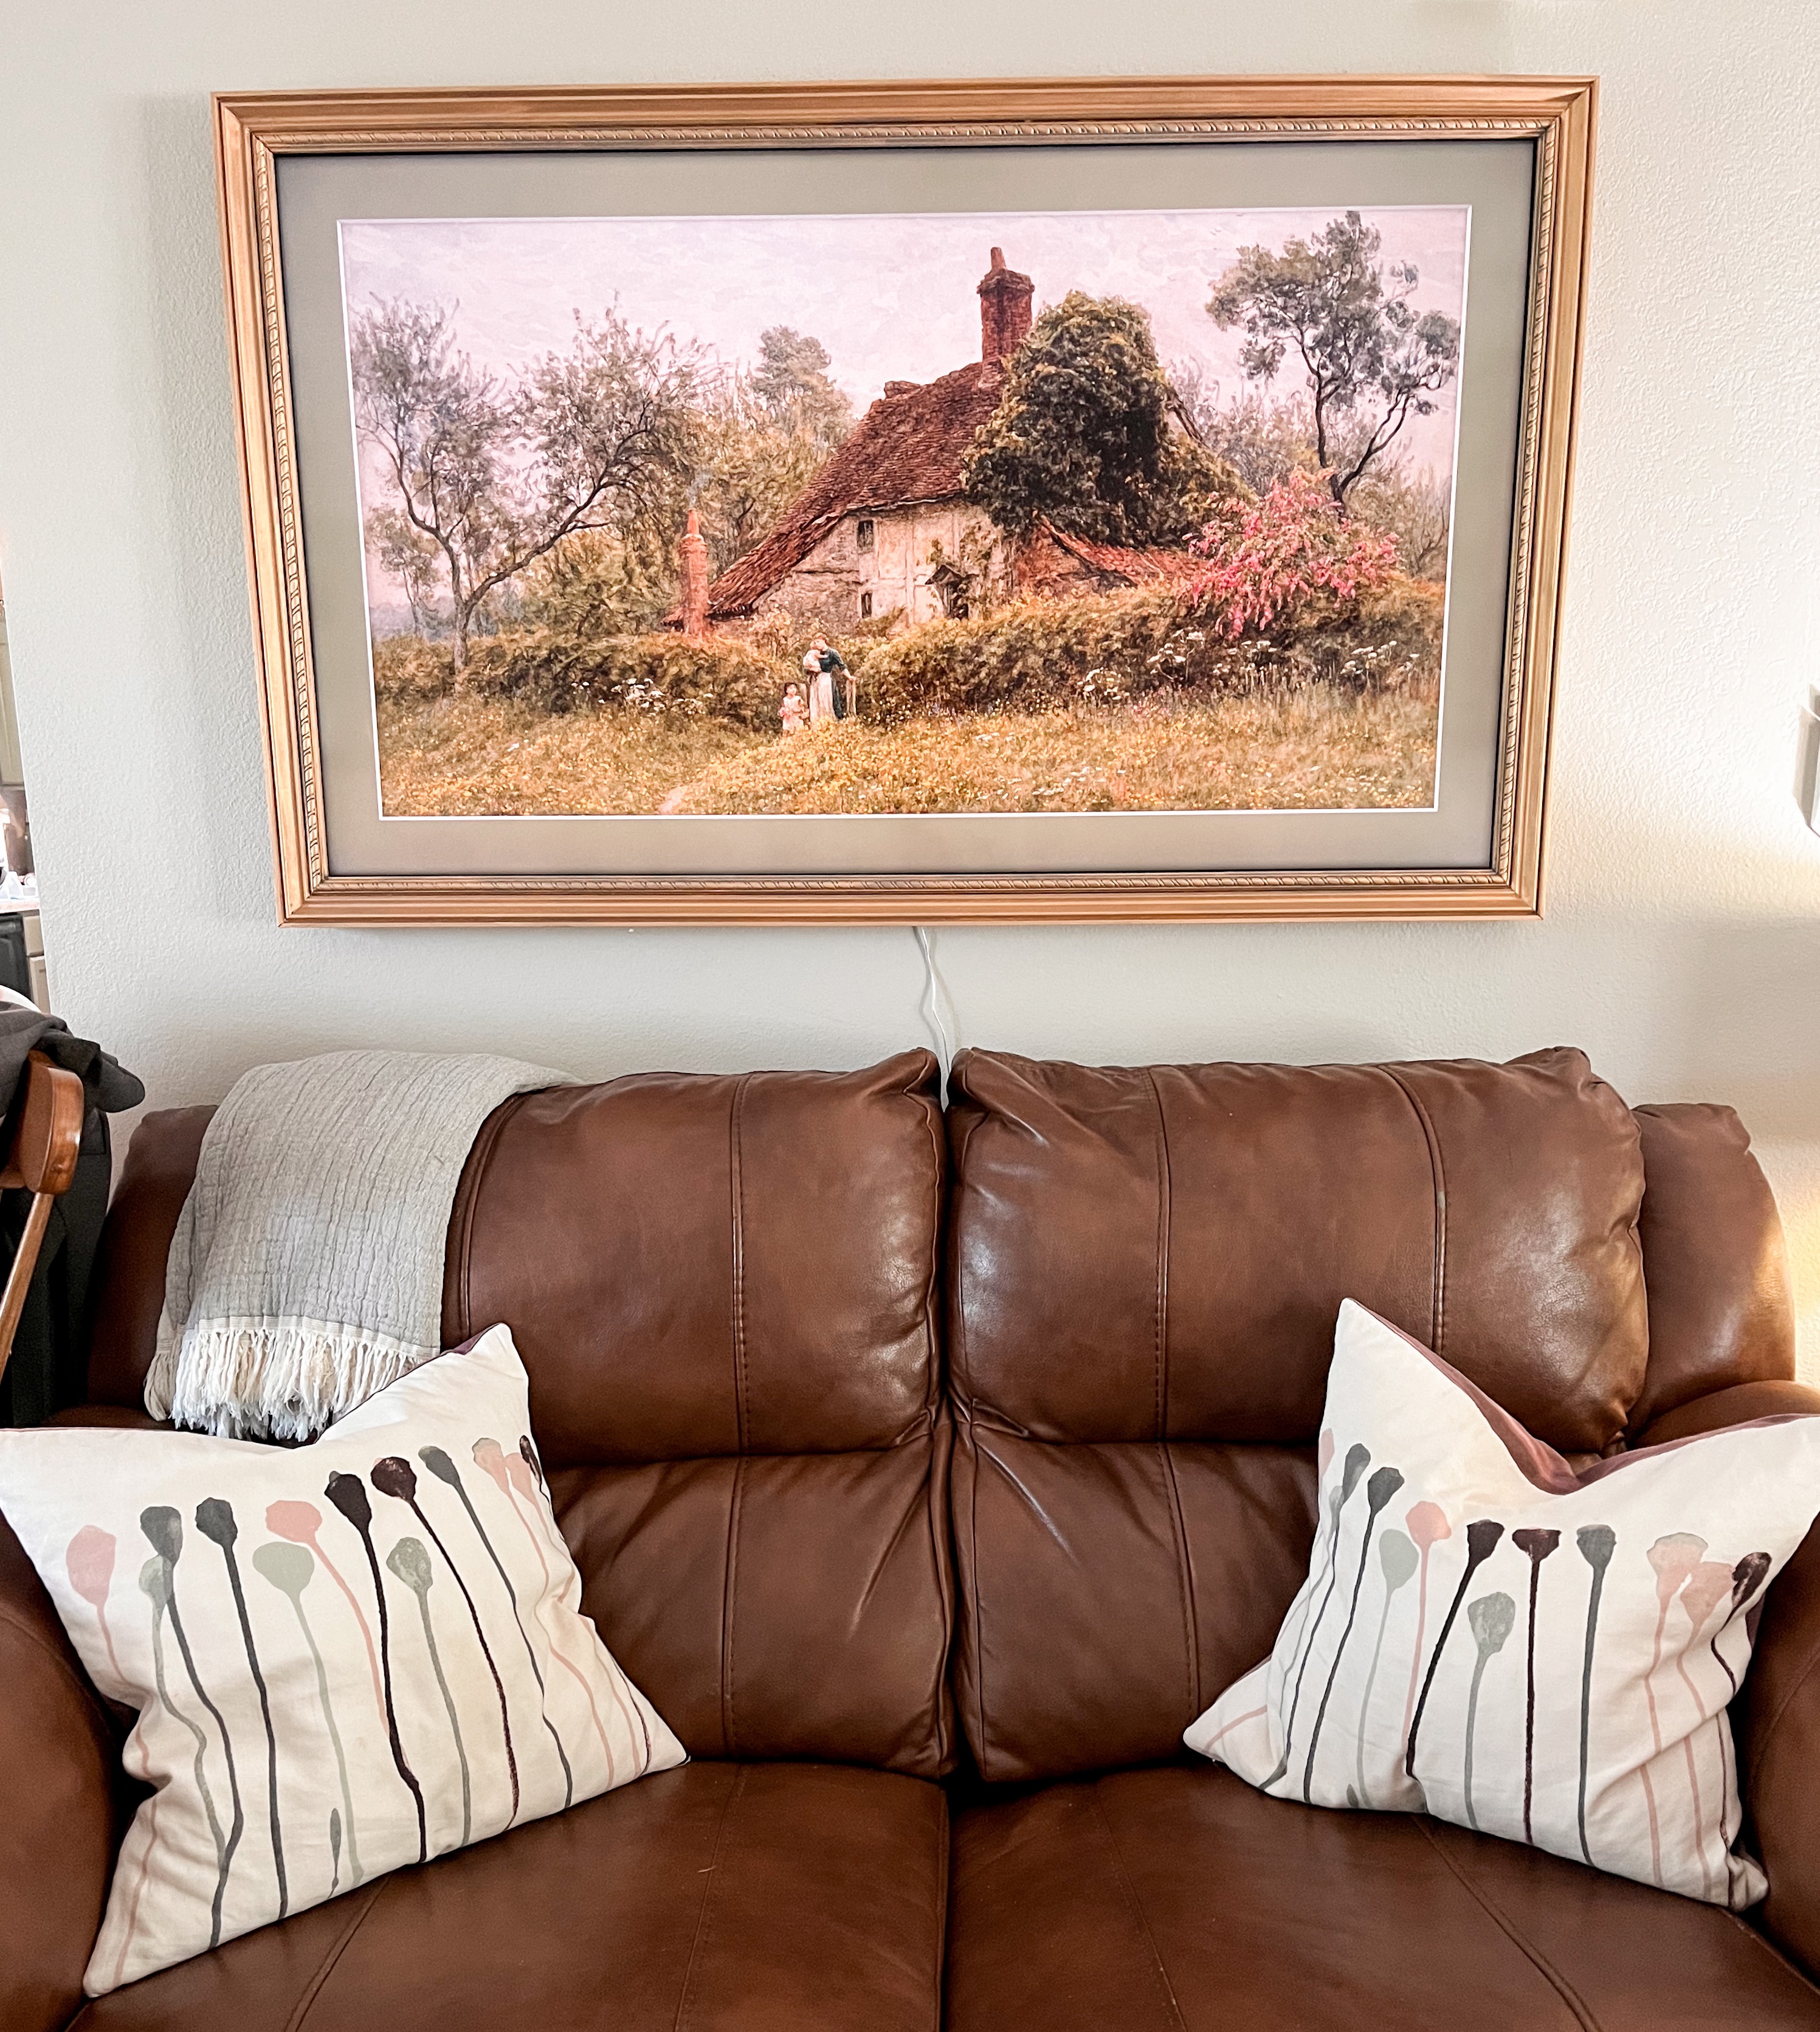
Last year on Black Friday, Amazon had the biggest deal yet on Samsung Frame TVs, so we snagged one. If you are unfamiliar with them, check them out here! When you aren’t using it as a tv, it will look like a piece of art in your home. We love this concept because we don’t want our tv to be the center of our home, but do want a TV in the our living room for movie nights.

Samsung sells magnetic frames to go with the tv to make it look more like a piece of art, but they can cost a good bit ($250 to $1000). We decided to make our own frame for under $50 dollars.

Even if you don’t have a frame tv, this is a great tutorial for making your own antique picture frames!

Supplies

-two 8 ft 1 by 2s of whitewood from lowes

-two Ornamental Mouldings  3/4-in x 1-1/4-in x 8-ft Unfinished White Hardwood Wood Shoe Moulding

-two 3/4-in x 8-ft White Hard Unfinished Chair Rail Moulding

-miter saw

-wood glue

-nail gun

-sand paper

-wood fill

dark chalk paint

Rub ‘n Buff antique gold

-corner clamps

-nails

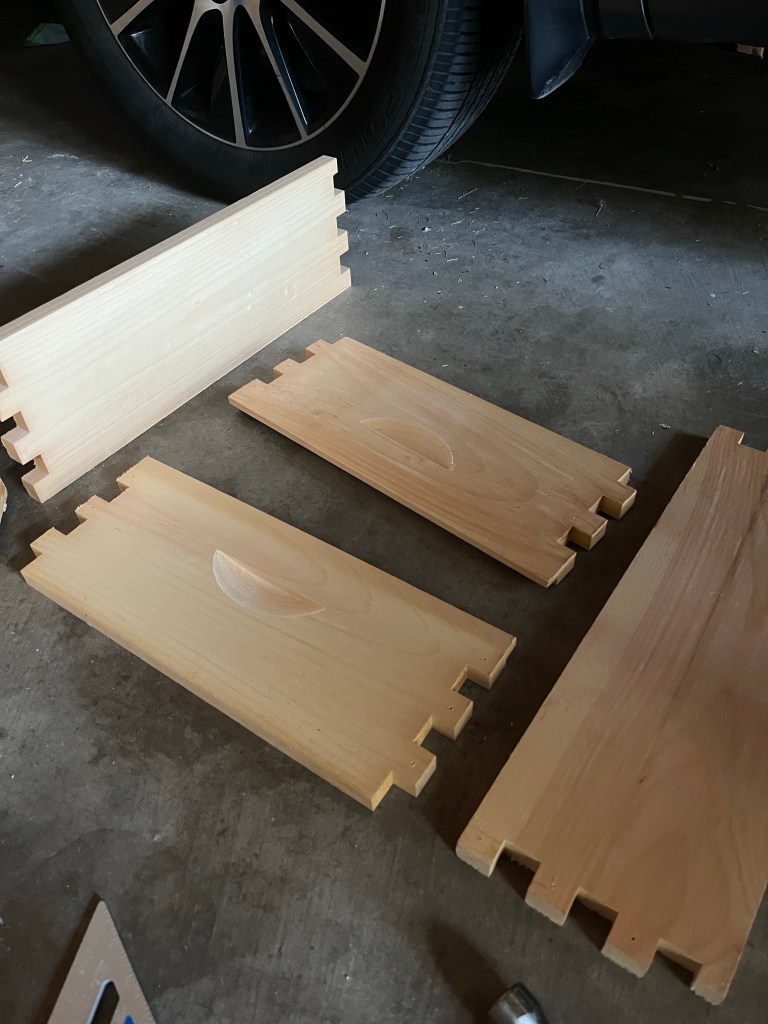
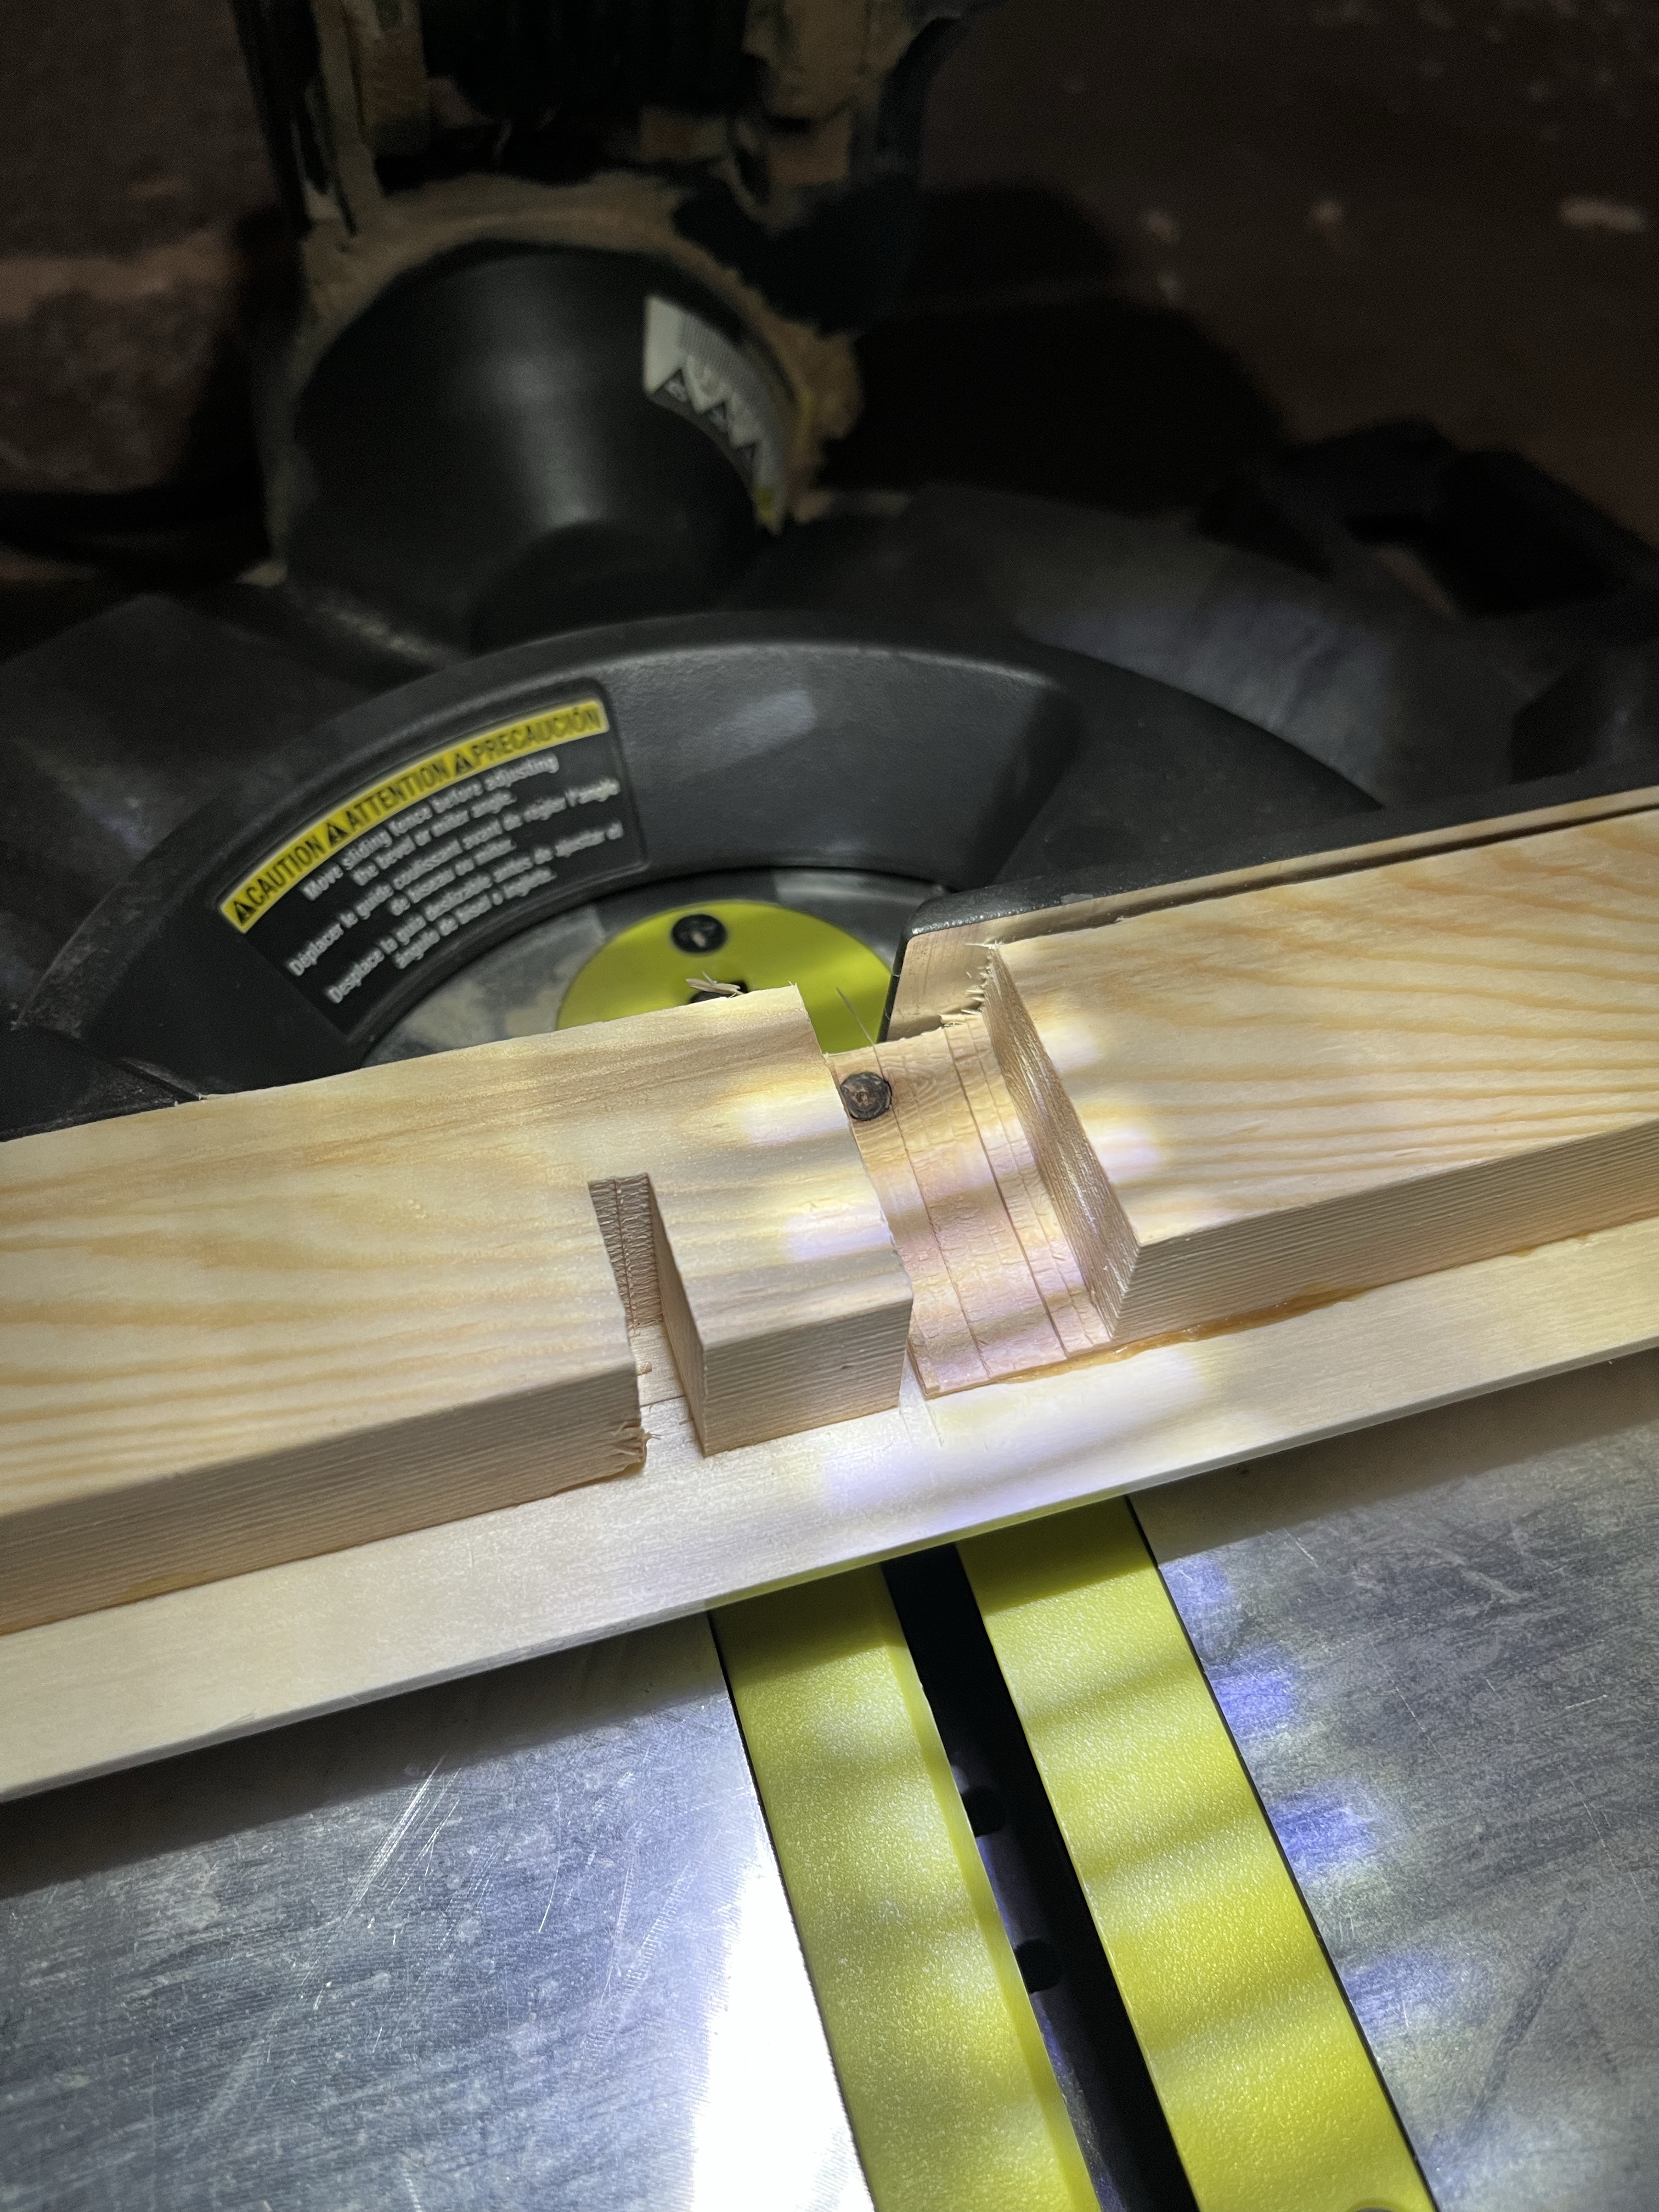
  1. Cut your frame to size using the miter saw and the whitewood boards at a 45 degree angle. The 2 inch (widest) side should be flush with the group when cutting the angle.
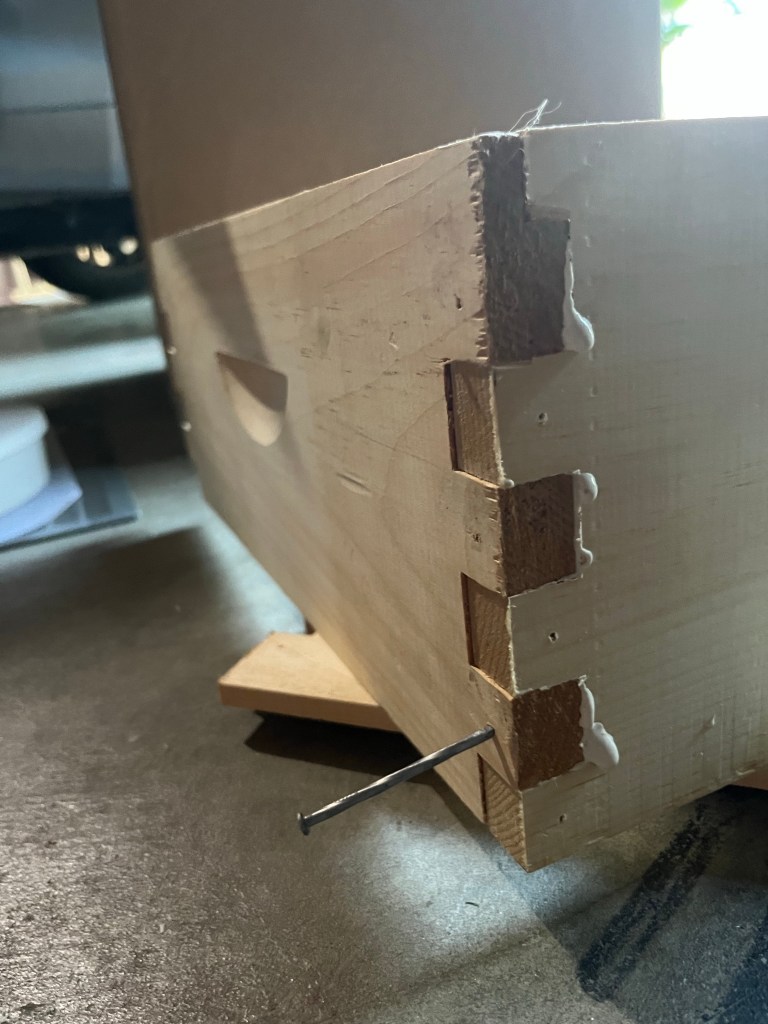
  2. Use a corner clamp to clamp the boards together. Ours didn’t work well but we got the cheap ones from Harbor Freight, so I recommend you invest in quality clamps.
  3. Attach the Corners with wood glue and finishing nails using your nail gun. Let the glue dry for a few hours.
  4. Check to make sure the frame fits your tv. The last thing you want is to finish the frame and it not fit.
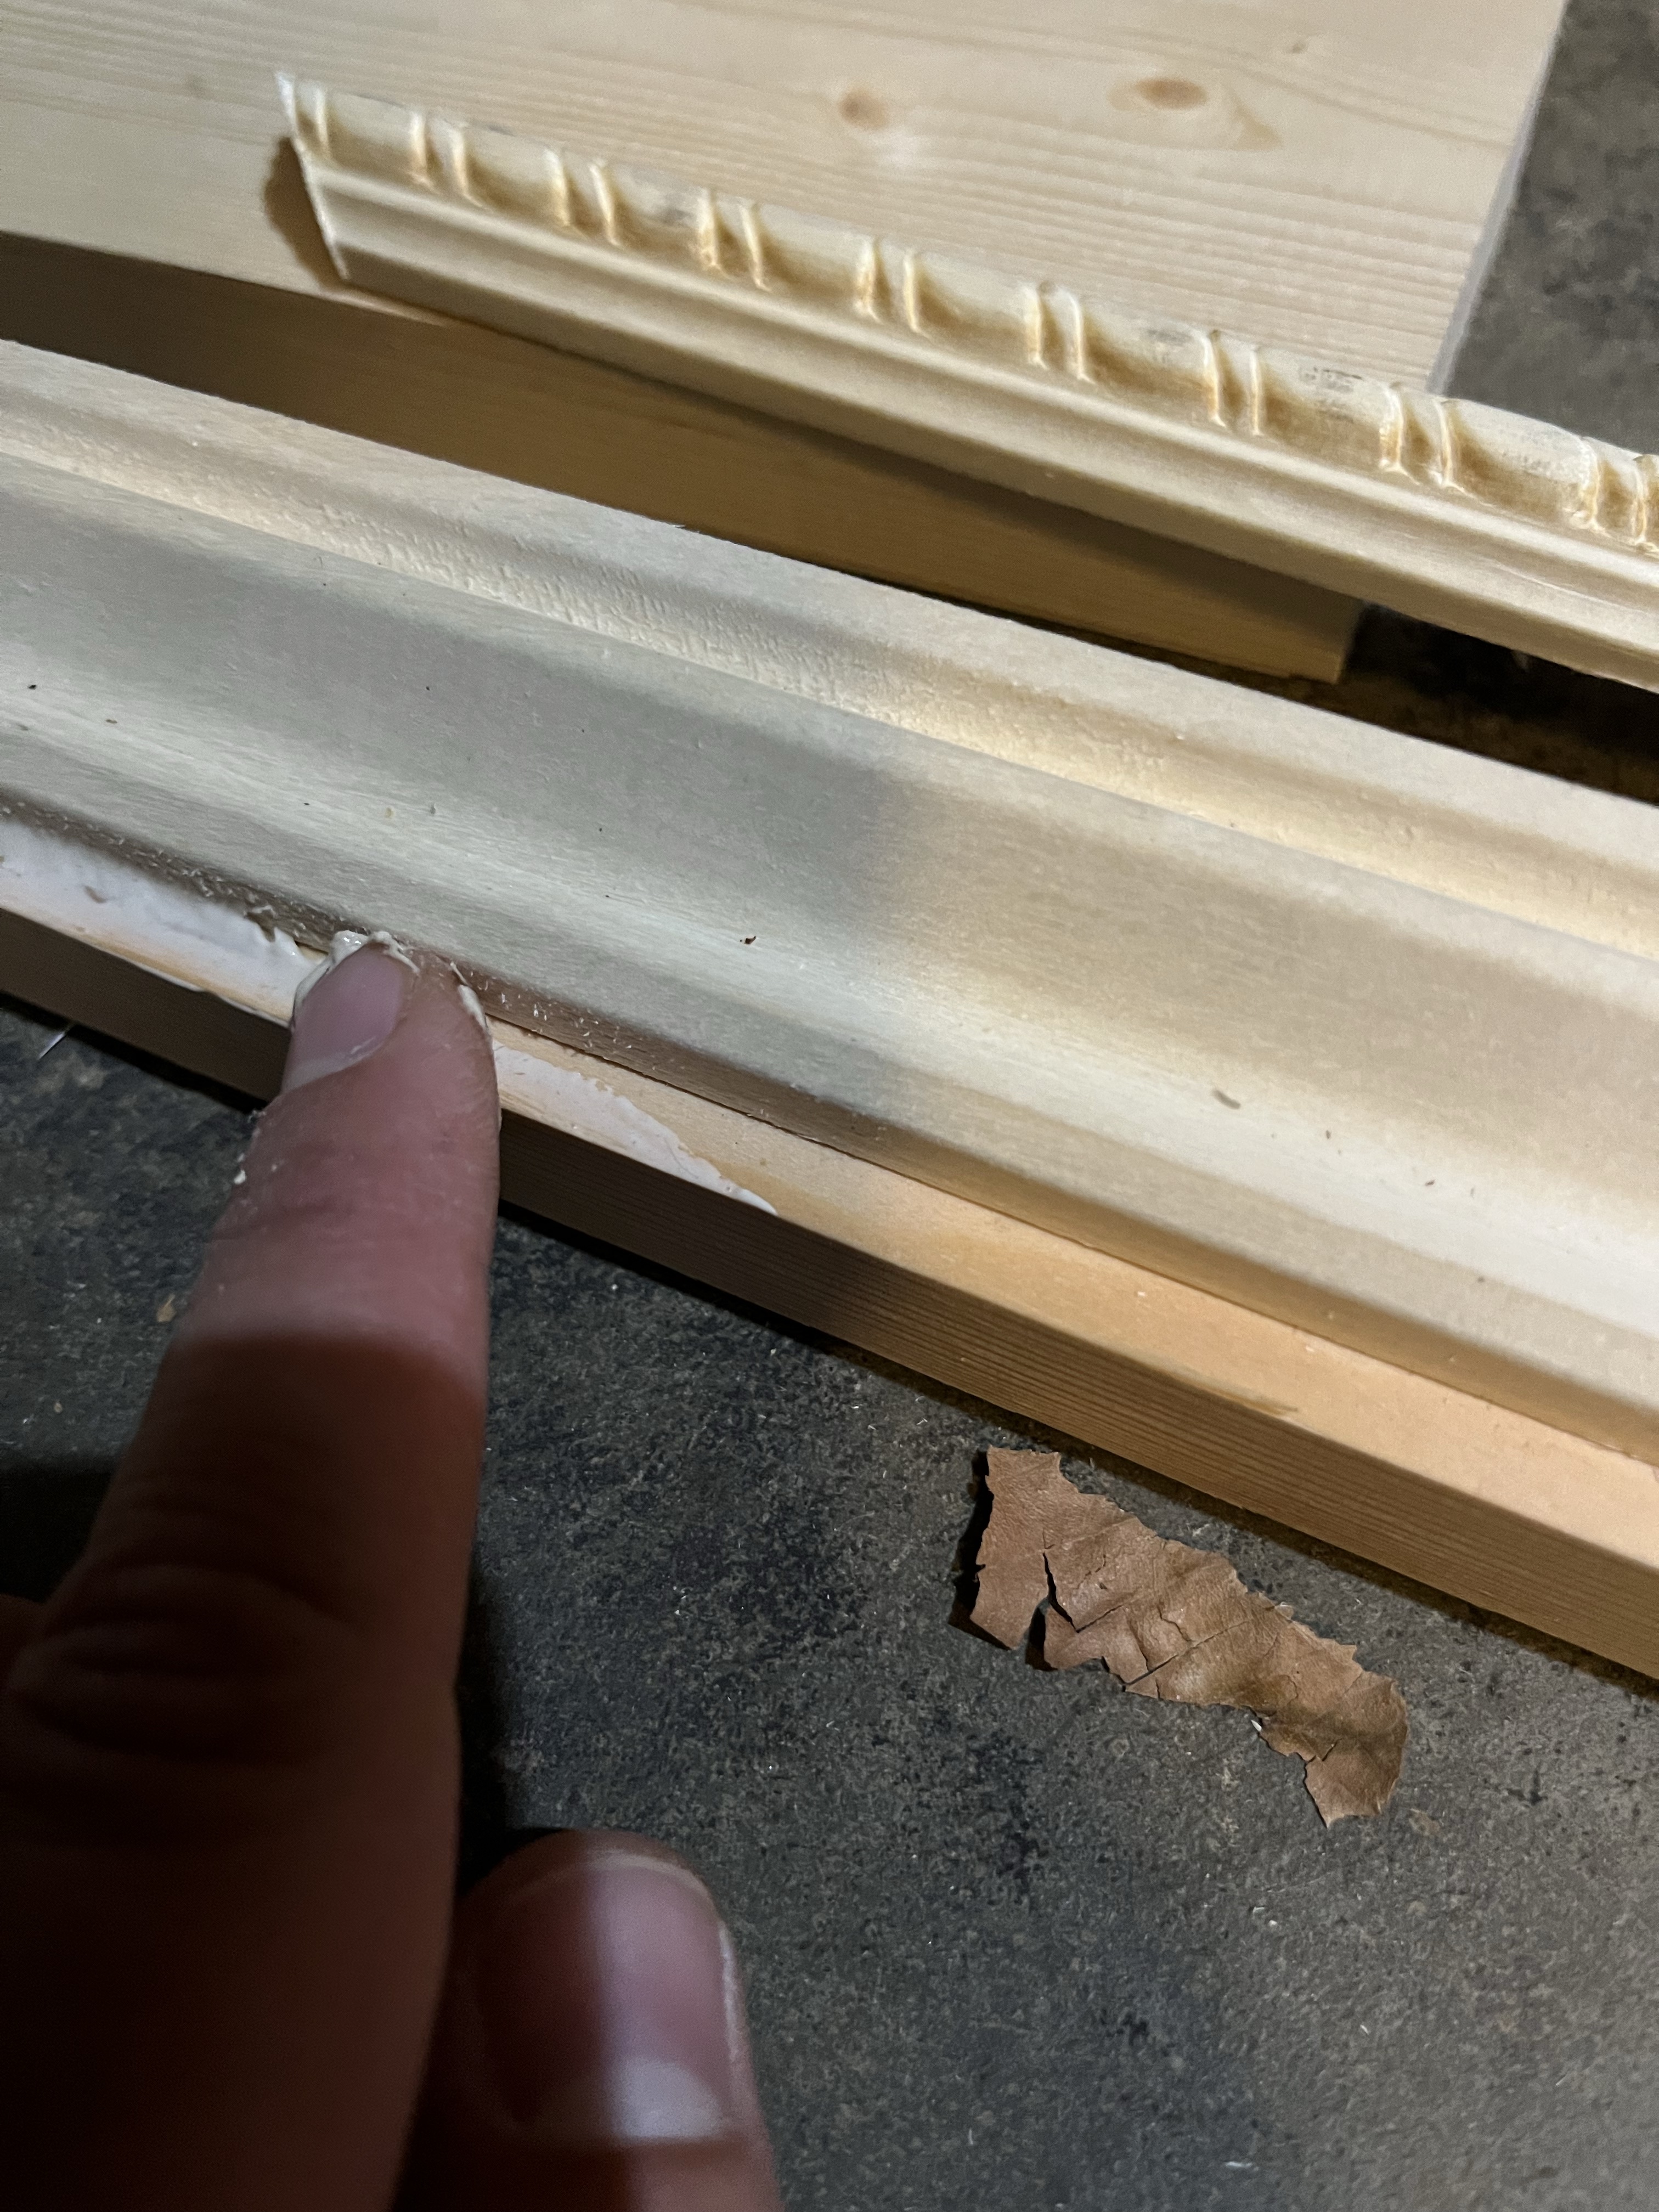
  5. Cut the chair railing pieces at a 45 degree angle to the same lengths as the base of the frame boards.
  6. Fasten the chair railing trim to the base frame using wood glue and nailer. Fill the nail holes with wood filler since the frame will be painted.
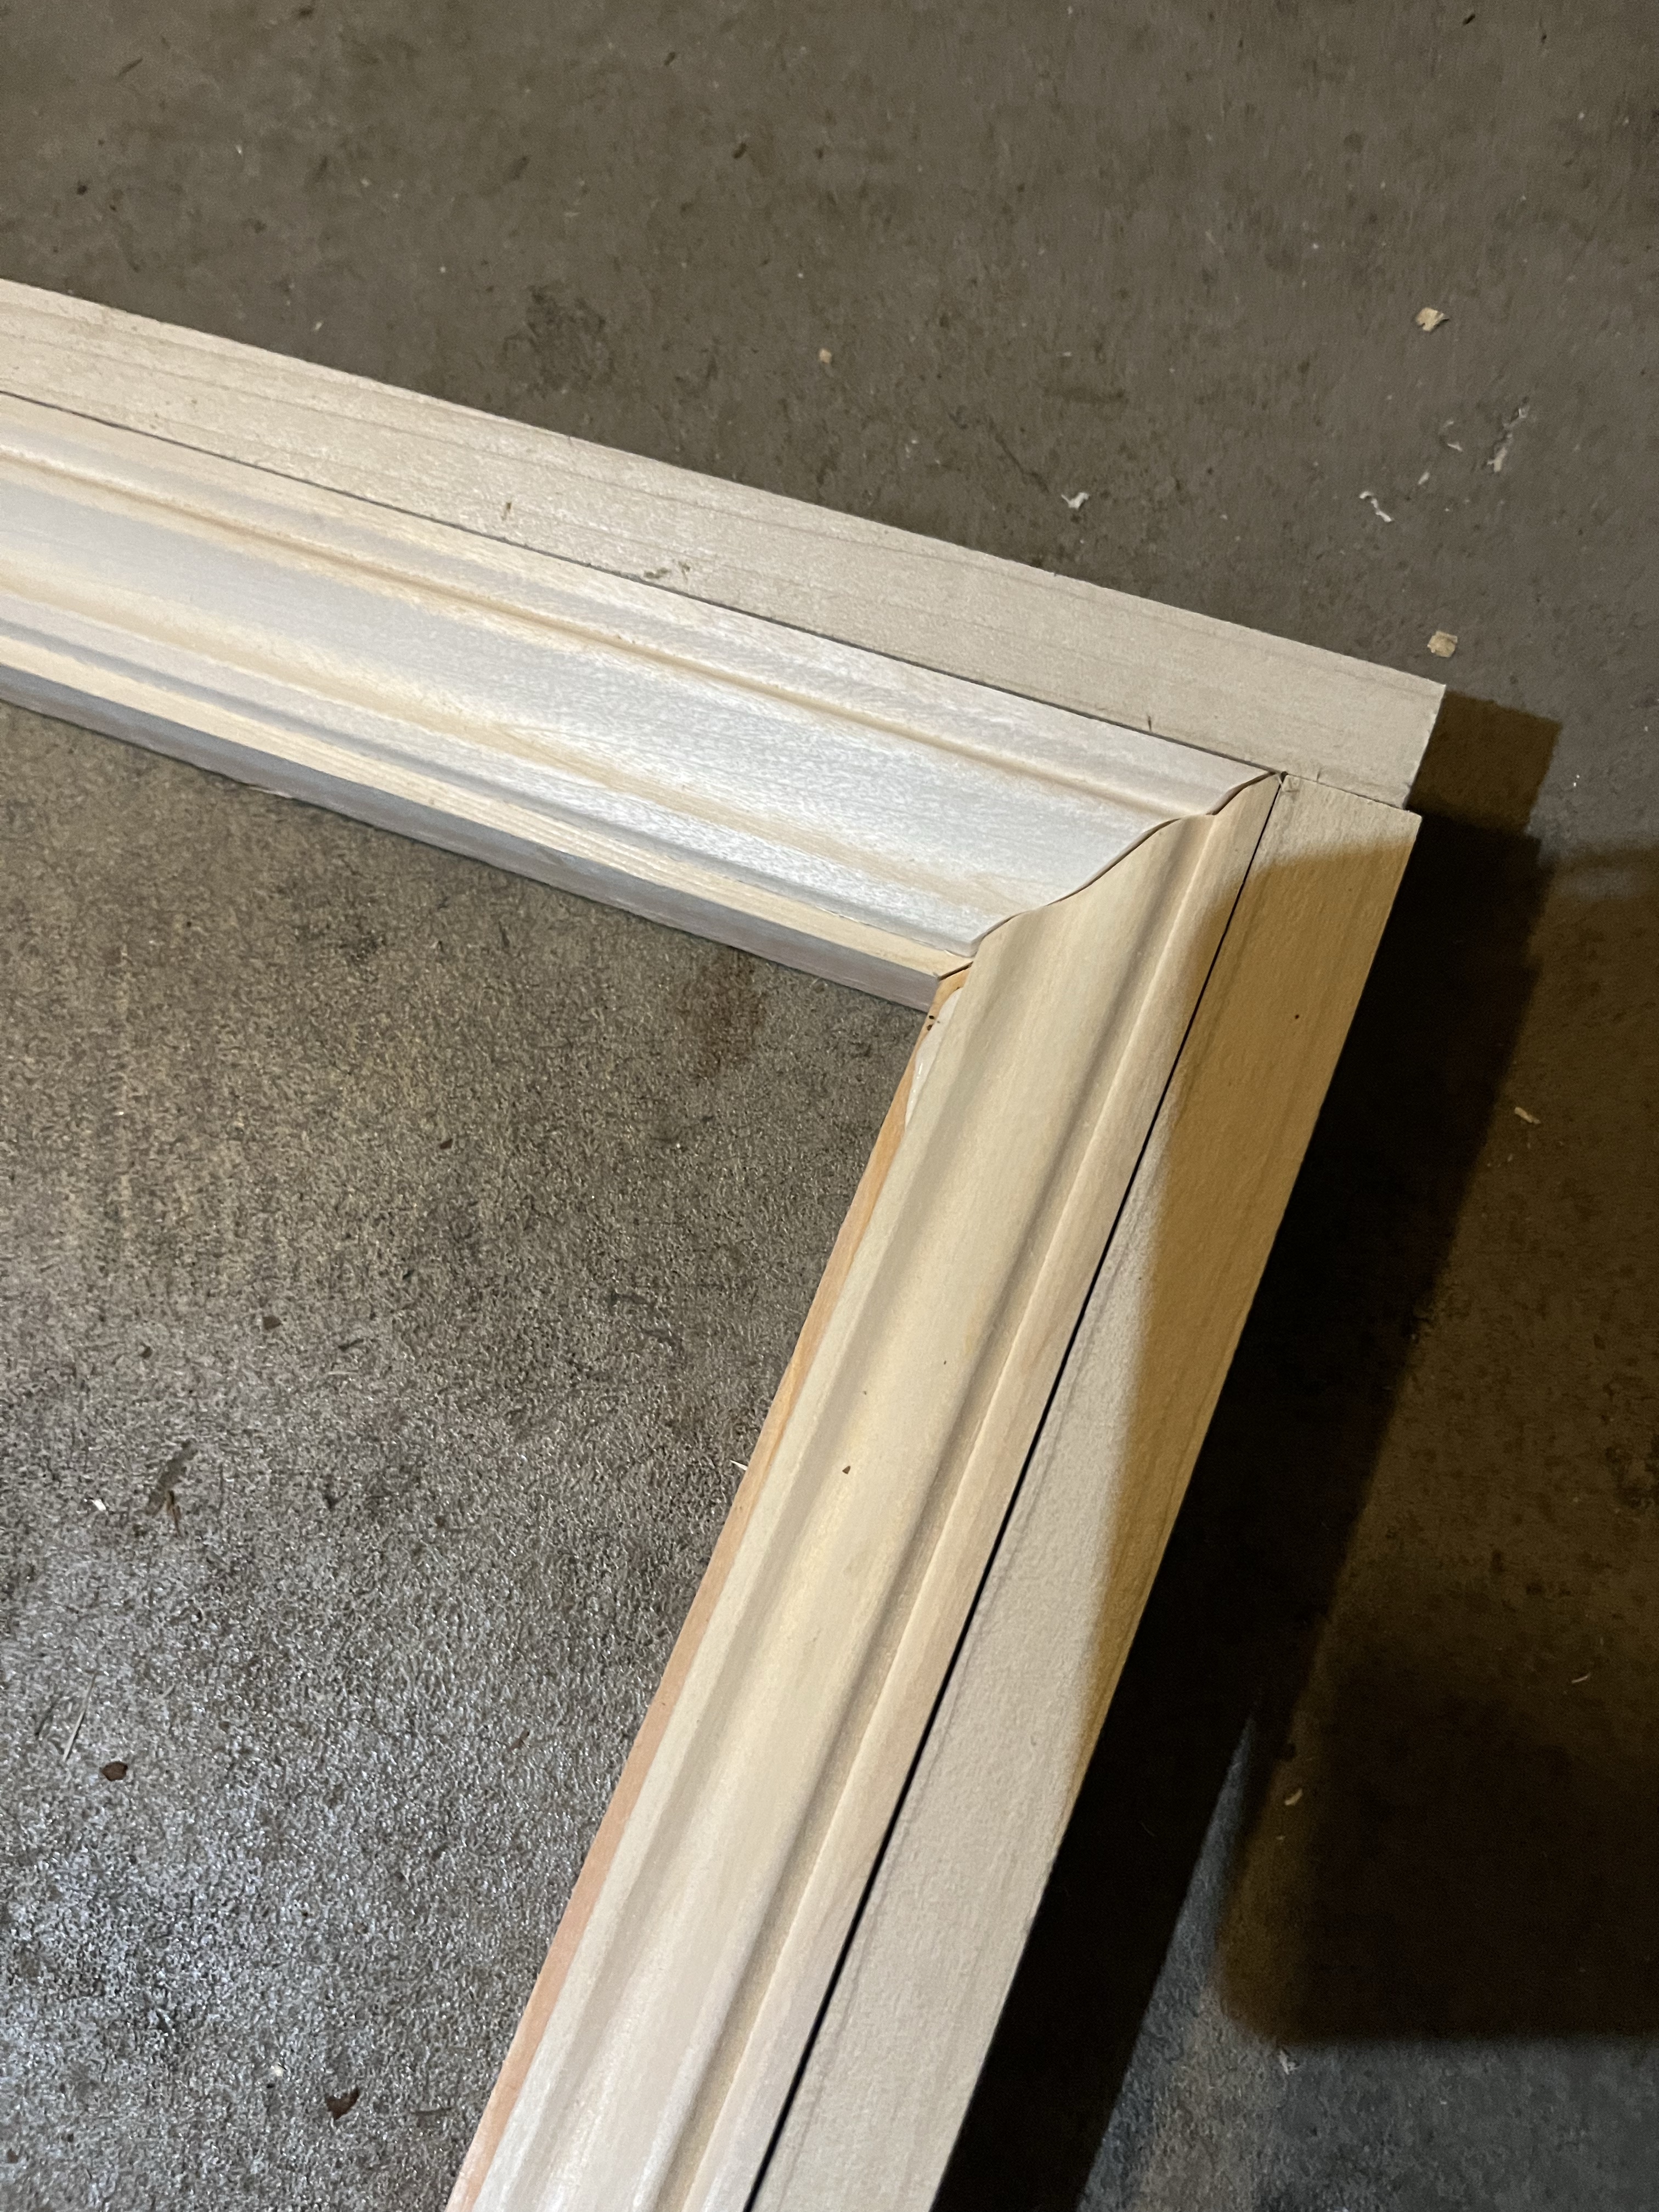
  7. Cut the shoe moulding pieces at 45 degree angles. Measure corner to corner of the chair rail trim to get the length of the shoe moulding pieces, the outer side of the 45 degree angle.
  8. Using wood glue attach the shoe moulding to the inner lip of the base frame. Due to the overhang of the shoe moulding you won’t be able to nail it so be sure to apply pressure and weight for a bit as the wood glue dries.
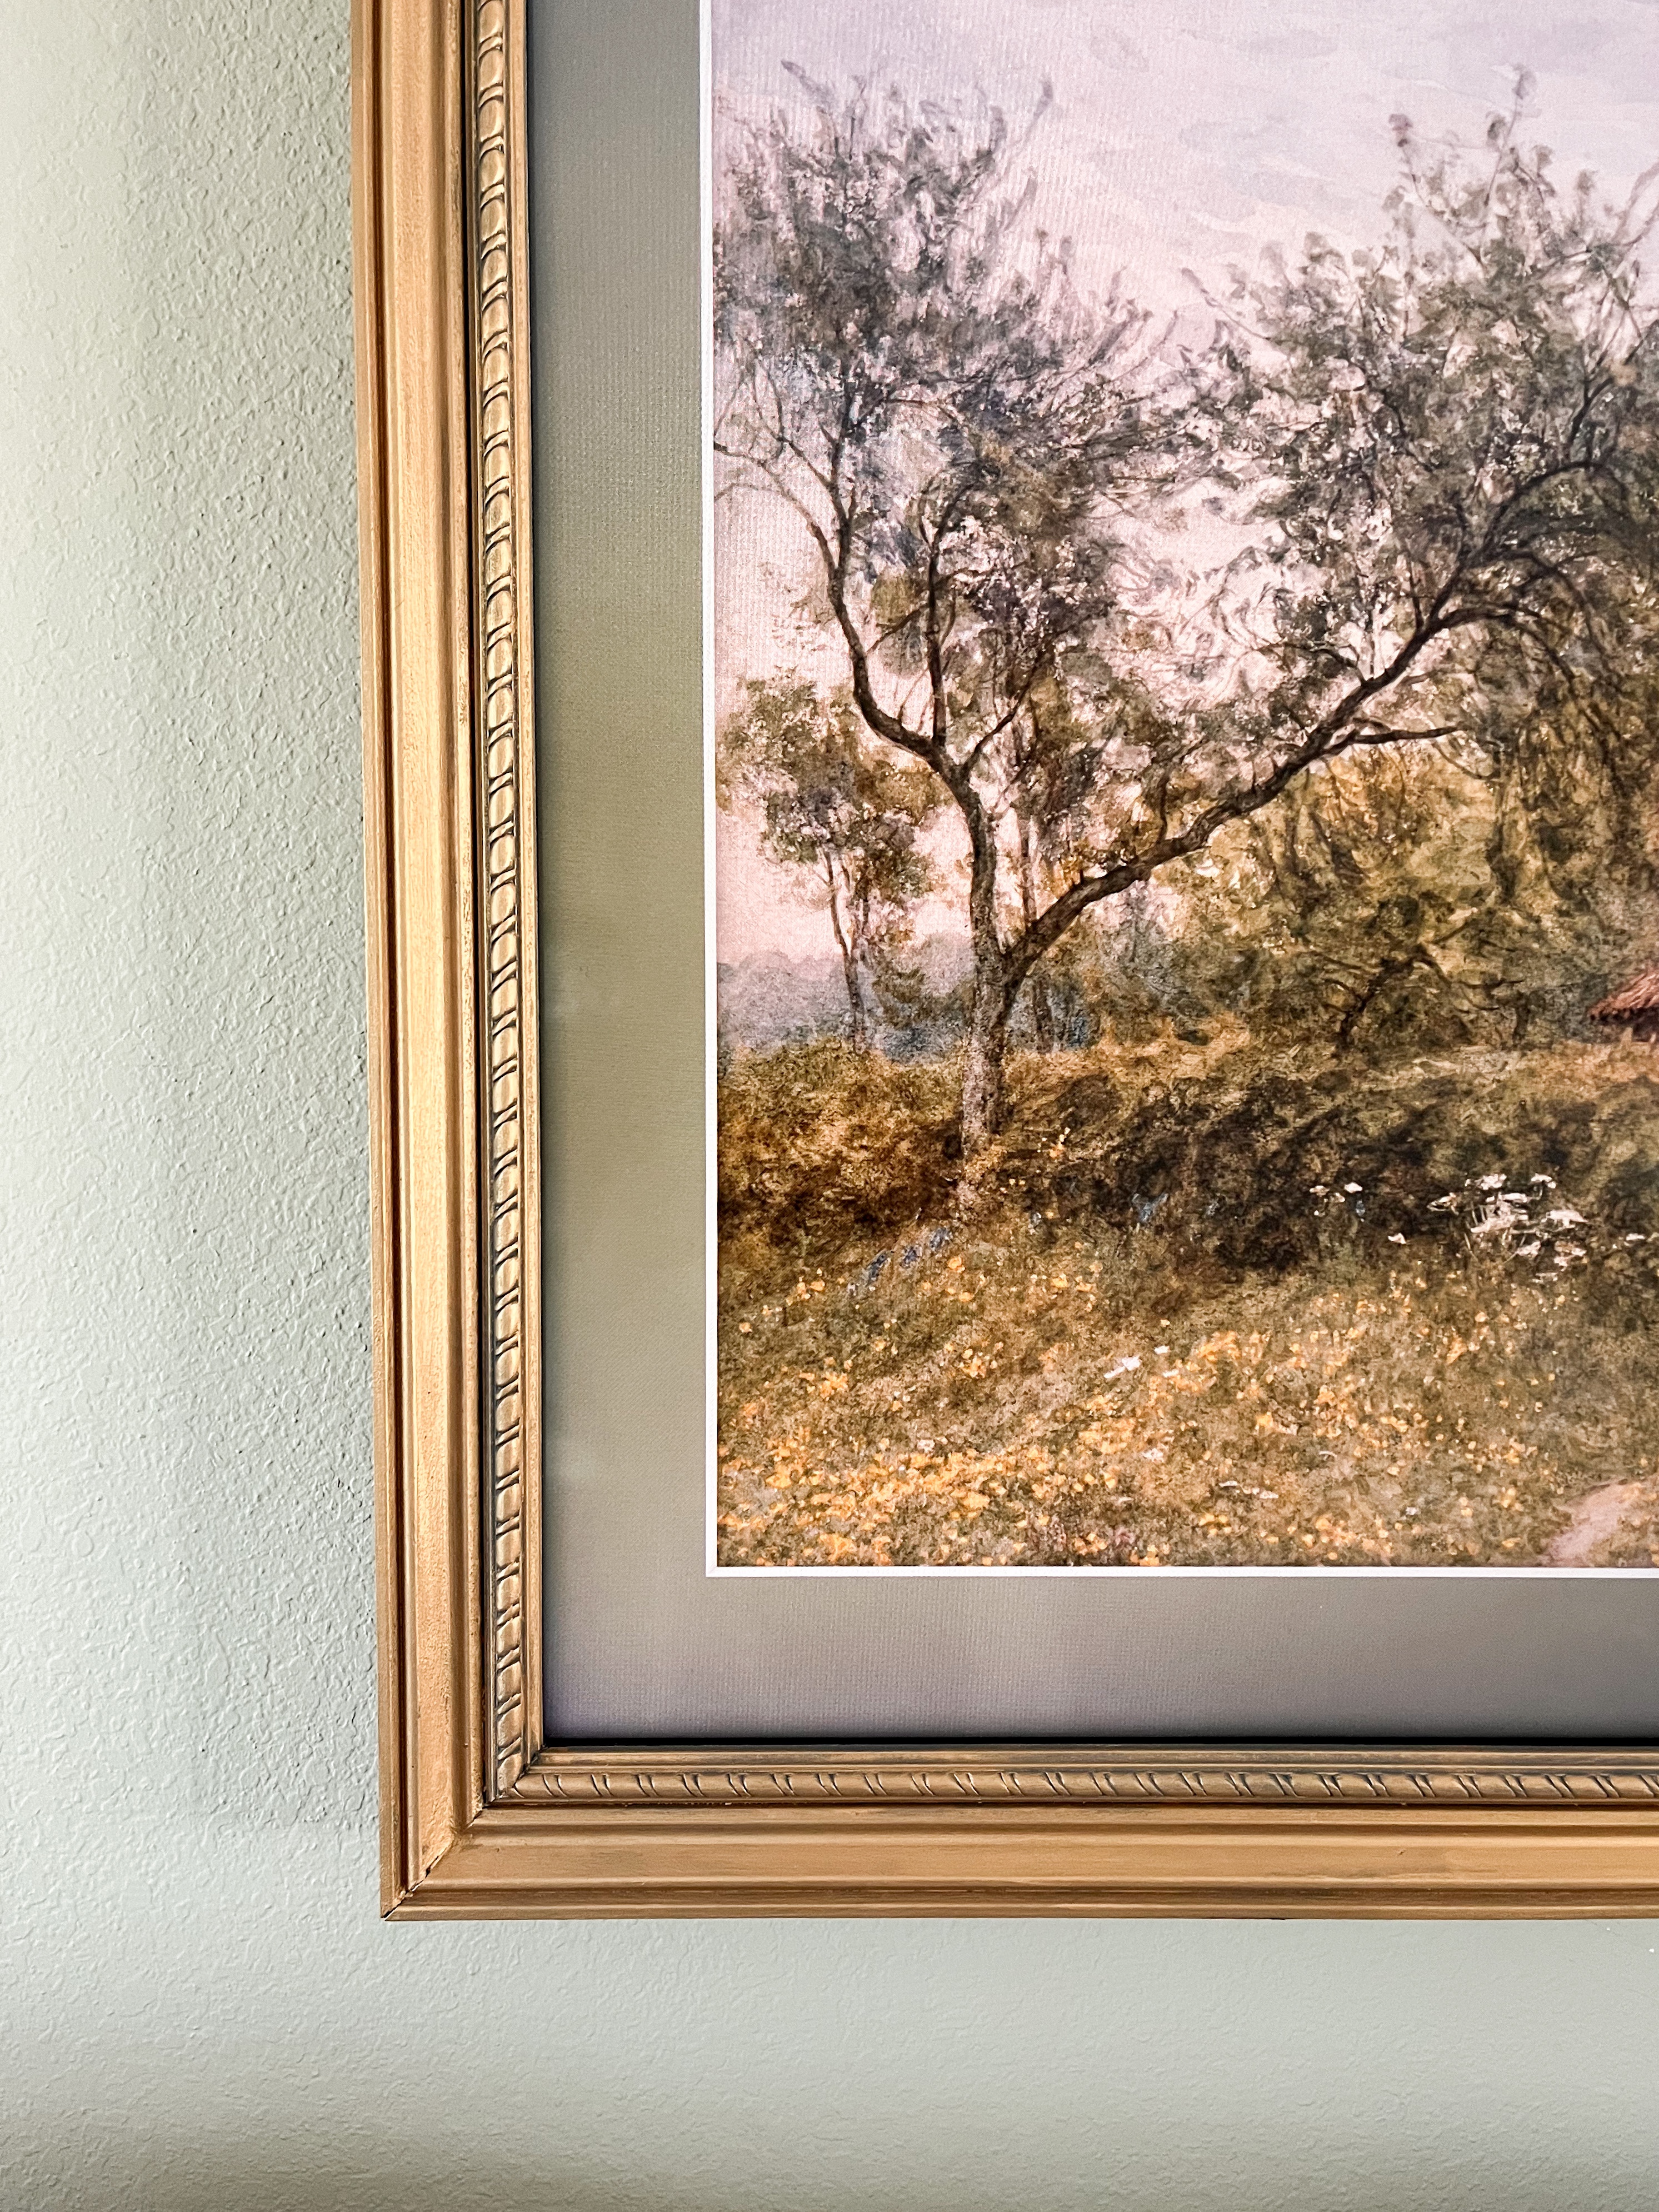
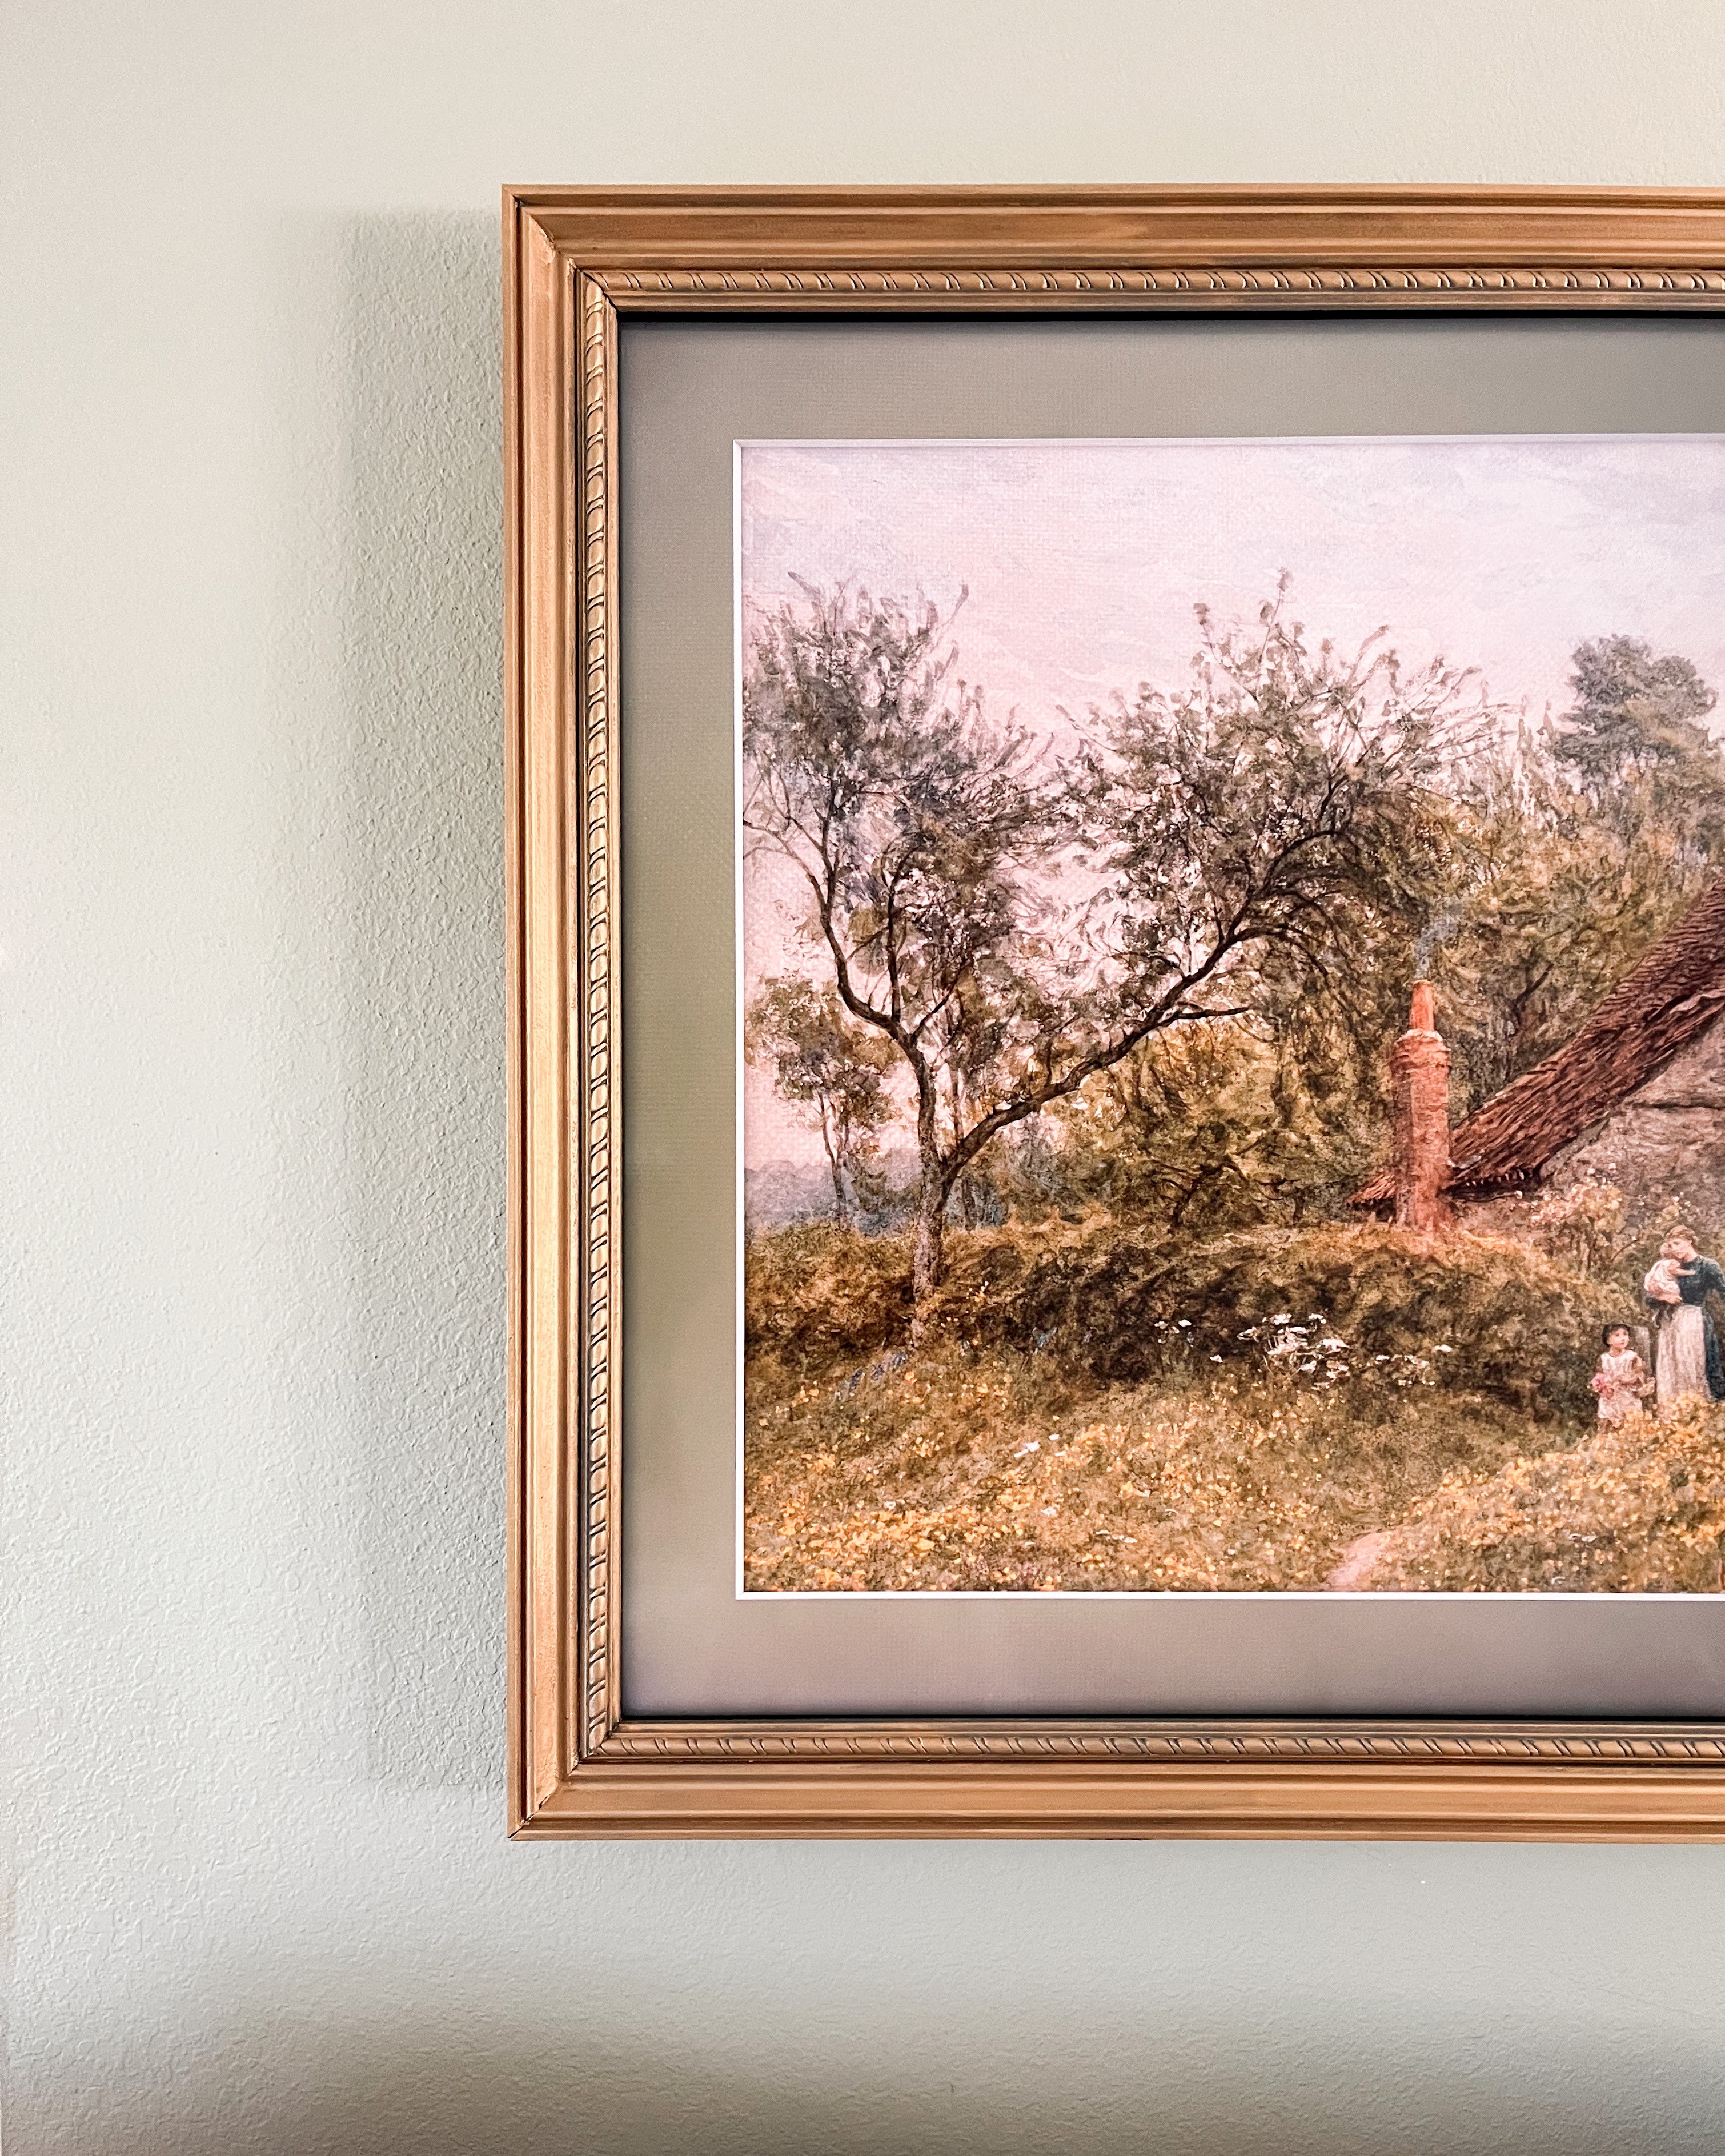
  9. Paint frame with a dark chalk paint. We used FolkArt Parisian Grey to give the frame an antique look.
  10. Using a sponge or brush, apply Rub ‘n Buff to the thickeness you want. The thicker the Buff N’ Rub, the less the chalk paint will show through giving the frame less of an antique look.
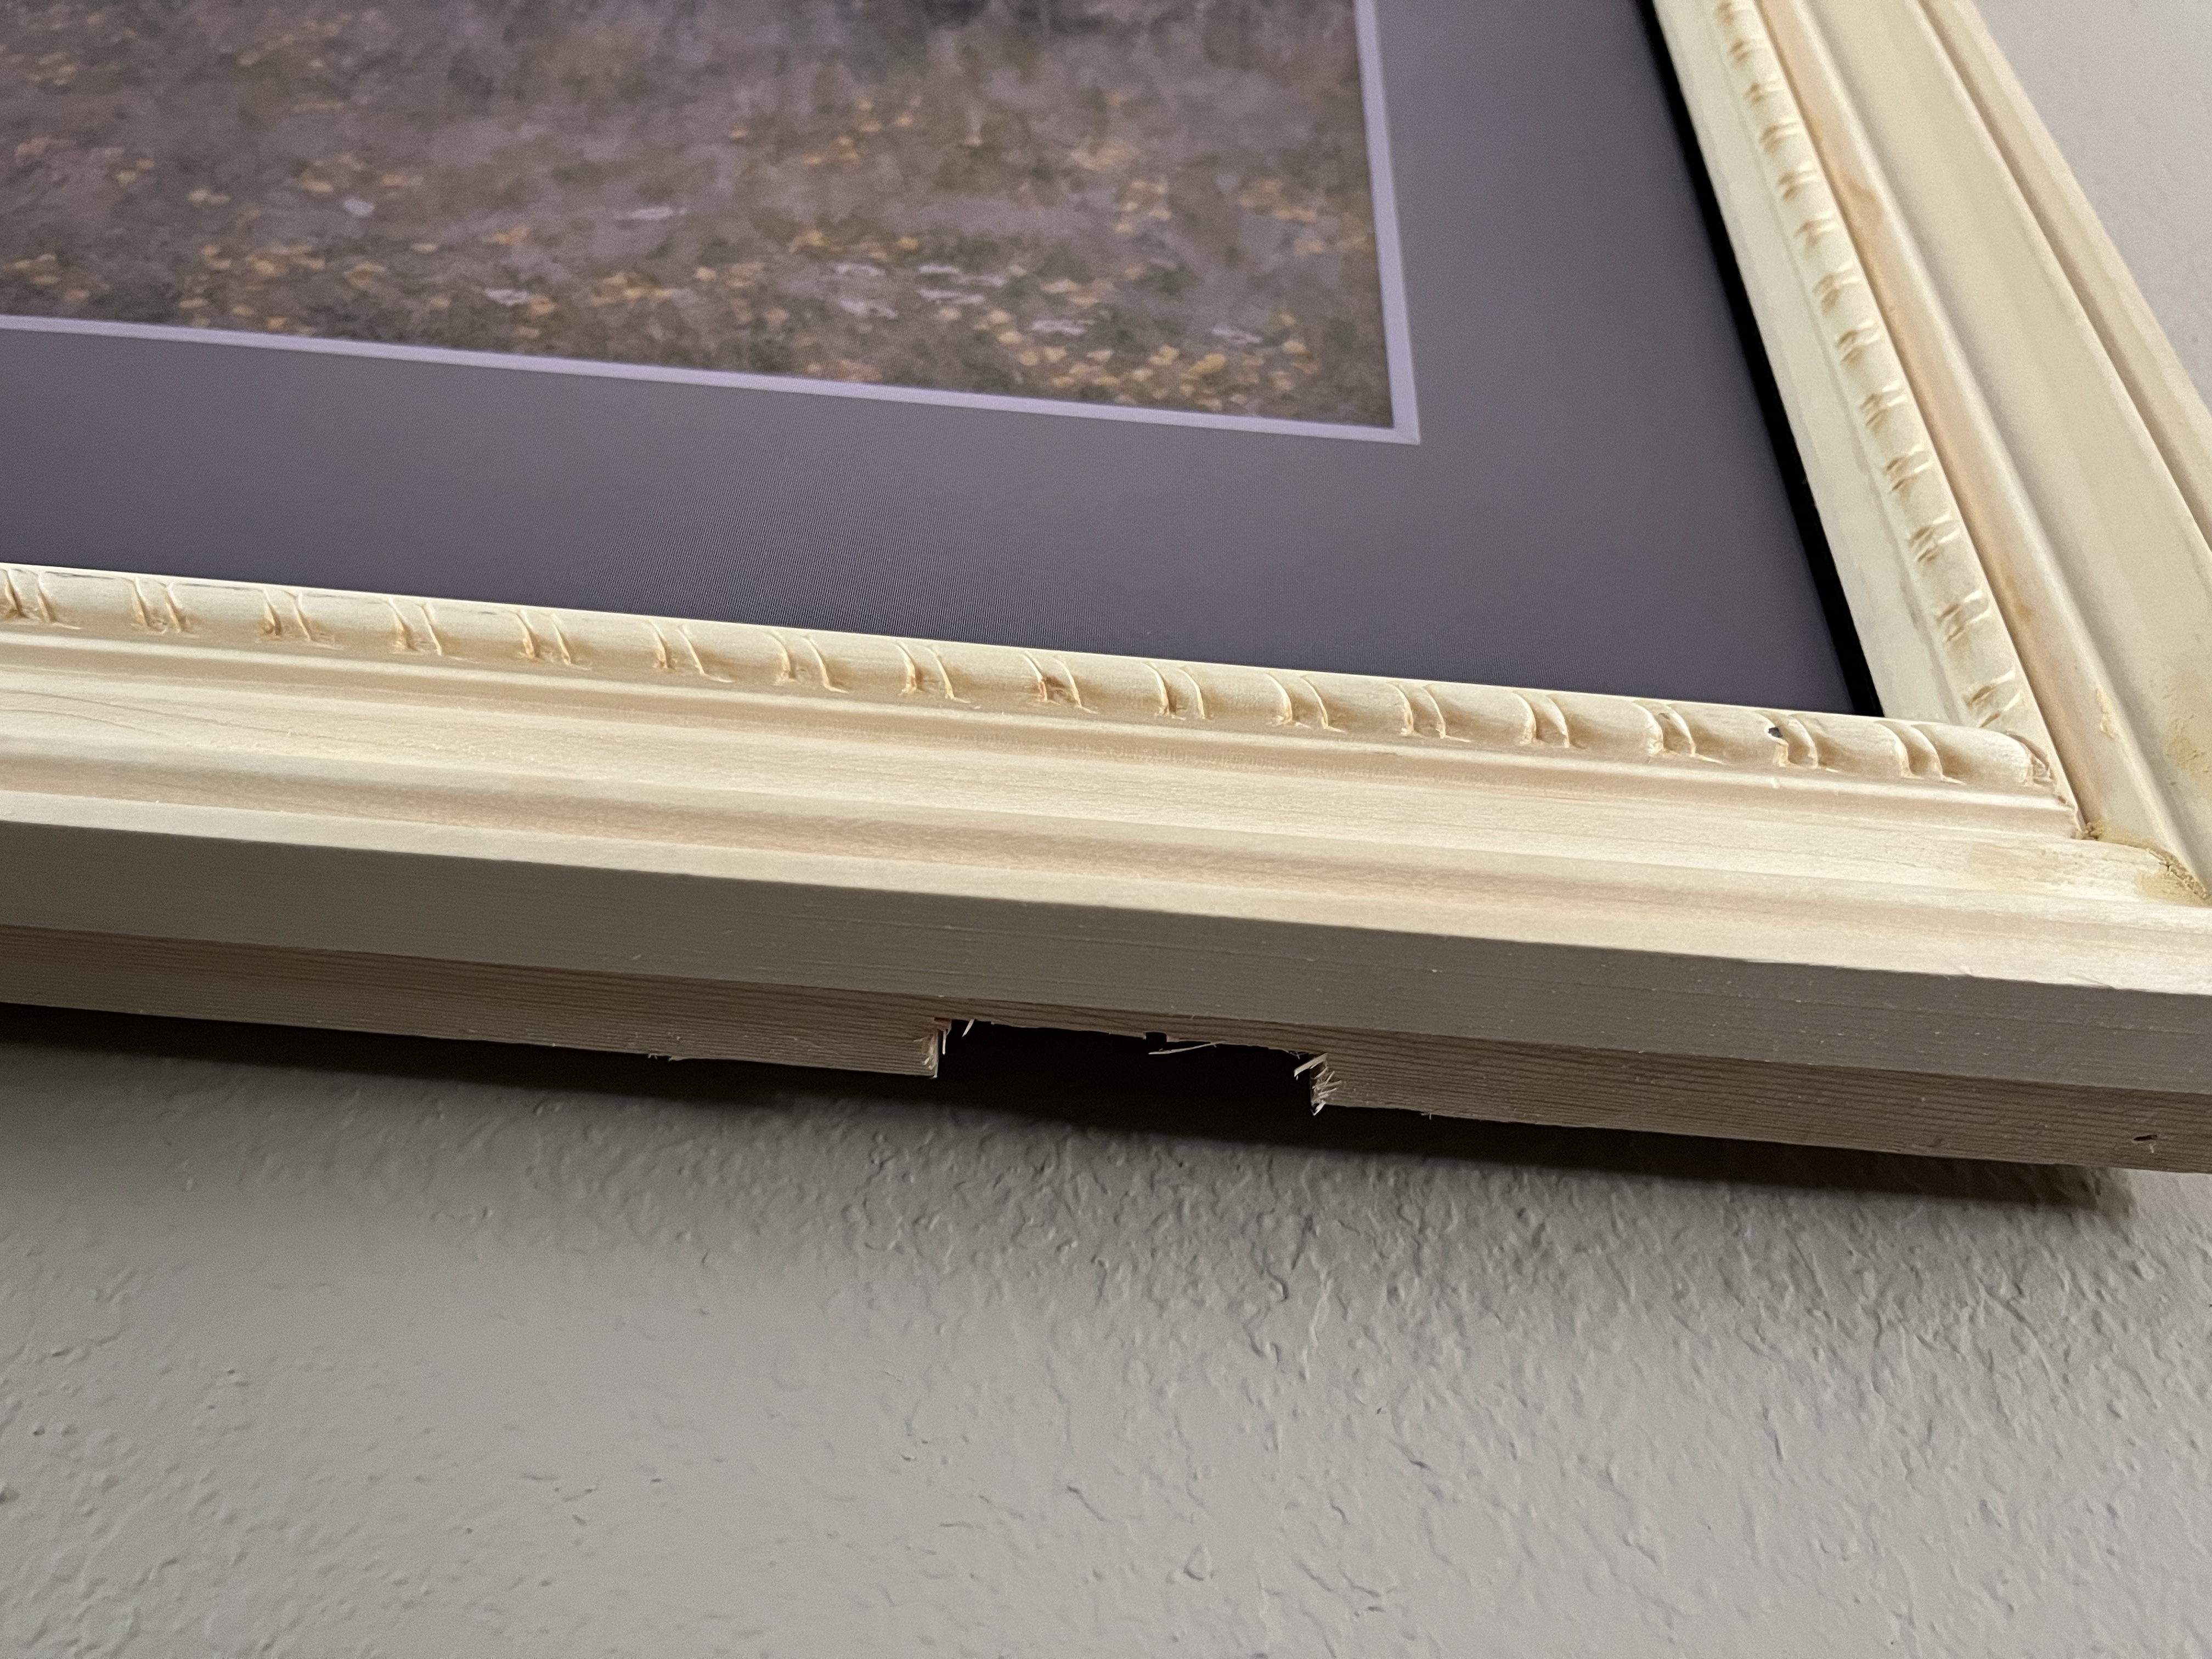
  11. Cut a piece out of the base frame for the sensor. Each Samsung Frame TV has a sensor to detech light and motion to turn the art on or off depending if someone walks into the room.
  12. Attach frame to the tv, we just pushed ours in place. It should have a snug fit so it should be secure.

Here is the finished product! To purchase an ornate frame just like this for the tv, it would have cost $599. We made ours for less than $50. Definitely worth pur time to make our own!

How We Gave our Home an Inexpensive Exterior Makeover

The Exterior is definitely something we wanted to update when we first bought this house and the updates were actually quite inexpensive. In an ideal world we would change out the yellow siding, but that wasn’t in the budget so we worked from the thought of “how do we make the house look good with yellow siding.”

We updated the shutters, the front door, the porch light, the yard, the garage and the mailbox.

Shutters

We are not a big fan of plastic shutters, so we made our own. For details of how we made them, go here. One thing to keep in mind from the instructions, some 1×4 boards aren’t true 1×4’s so be sure to line the 5 back boards up before measuring the rails.

Garage

We then painted the garage and front door frame to an off white, using Glidden Exterior paint, Color: Fog, and added these magnetic garage hinge and handles for that added finish. Be sure to clean the surface well before painting.

Mailbox

We changed out the mailbox, painted the post with leftover exterior white paint we found in the garage from the previous owners, and updated the numbers.

Front Door

For the front door, we removed the storm door, replaced the door with a craftmans door and painted the door frame to match the garage. We found the front door on marketplace for a fraction of the cost. We did have to drill the hole for the door handle, which turned out to not be too difficult when you bought door lock installation kit.

Removing the storm door frame was comical, I tried for months to pry it off after removing the external screws and no hope. Turns out storm door frames have hidden screws behind the removable covering.

The biggest thing I learned is when in doubt, look it up on youtube. After asking youtube how to remove a storm door frame, it took me around 15-20 minutes to remove!

After removing the storm door frame, I filled in the screw holes with wood fill and sanded to make it flush with the door frame. Again, don’t forget to clean the area well before painting. It took 2-3 coats of paint to cover the red well.

The Yard

We had a massive tree blocking our house and causing a lot more hassle than necessary, so we chopped it down ourselves. We did pay someone to grind the stomp though, which was definitely worth it and we had enough mulch out of it to cover our landscaping we did in the back of the house and to recover all of our river birch trees.

We had a walking path as well that we decided to tear out due to the hassel of upkeep and the frustration of trying to mow around the rock path.

We planted grass and you can’t even tell a walking path was there before. Next spring, we will plant more grass over where the mulch was for the river birch before and our next project for the exterior is replacing the white columns with cedar posts, so stay tuned for that DIY!

Comment with your favorite update and/or questions!

We are Officially Beekeepers

Last summer, we harvested honey at a friend’s house and that’s when we first entertained the idea of becoming beekeepers!

Having honey bees is a great help to the enviroment. Due to pesticides, honey bees are at risk of extinction and without bees plants can’t be polllenated and that affects our food supply. We wanted to be able to help keep the bees going but also love honey and use it as a sweetener in our house.

Due to the generosity of friends gifting us som supplies, we were able to get our first bee hive set up within one month of buying the land. We are definitely not experts, but everyone has to start from somewhere. We hope by sharing our experience, you all can have the confidence to start beekeeping or even to start something you never thought you would!

So here is your beginner’s guide to beekeeping!

Supplies (we purchased most of our supplies from https://www.mannlakeltd.com/ and Amazon )

-Beekeeping Suit with gloves

-a Bee Nuc (includes 5 brood frames full of bees and a queen)

-a smoker

-at least one brood box (get two if your winters are tougher) with frames with reducer and entrance reducer (Link)

-a super box with frames

-bee feeder (Mann Lake Bee Feeder)

Purpose of supplies

-Brood box is meant for the bees eggs and honey to eat

-super box is for us, it is the surplus honey the bees make

-entrance reducer limits the entrance of the hive to block other critters from getting in

-bee feeder – for when you start up a new hive or during the winter when nectar isn’t around. You fill it with sugar water (1 part sugar, 1 part boiling water)

The Bee Hives

We purchased the unassembled boxes and frames to save money. They are very easy to put together, so we definitely recommend going that route. We only needed wood glue and nails.

Once we finished assembling the bee hive boxes, we painted them white and added a cute Winnie the Pooh design. You will need to paint or stain the boxes in order to preserve them.

Adding your Nuc to your Bee Hive

Next we went to pick up our nuc and took it to our land where the bees would be living. We bought ours from someone local through a bee keeping facebook group but you can get them online or a local bee supply store. We set up the hive first, you will want to place the hives somewhere in the sun (bees love the heat), far from foot traffic, and up on something (we used cinder blocks).

To integrate your nuc to your hive, you will remove 5 empty frames and replace them with the nuc frames, placing them in the same order from the nuc box. Remember to have your bee gear on and your smoker going–especially when first working with your bees since you don’t know their temperment and they don’t know you yet.

Feeding your Bees

For the first couple of months, you will want to feed your bees sugar water (recipe above) to let them get settled. We used a feeder like this, Bee Feeder. We feed our bees once to twice a week. We don’t want them feeding on their own honey except during winter, so we wanted to make sure they have some sugar water at all times.

Happy Beekeeping!

Now you just let them to their thing. We occasionally check the frames for mites, beetles, wax moths, and that there is new larve (that is the easilest way to know your queen is around).

We will make another post on specifics for treating for these pests.

Comment with any questions or advice you have!

Montessori Toddler Wardrobe

As our son is getting older and we are having another baby (A girl) in a couple months, we wanted to update his room to allow him more autonomy through better intergrating Montessori. The first step was creating him a wardrobe. We looked online for ones to buy and most will be at least $250 on Etsy. We looked for plans for making one and there weren’t much to go off of either. So we went off the little bit we found and enhanced it. Knowing that eventually our girl would be needing a wardrobe as well and they will be sharing a room for now, we made ours have two places for hanging clothes with the shelves in the middle. We were able to get all our supplies for under $100.

Supplies and Tools:

  • 23/32 in x 4 ft x 8 ft sanded plywood (we went with pine)
  • 3/4 in x 3/4 in x 36 or 48 in Pine Round Dowel
  • Sander if you want it to be more smooth
  • 180 grit sandpaper
  • Kreg Jig
  • 1/4 in screws
  • White wax
  • Wax brush
  • Saw (we used our circular saw to cut the dowel and the 32 in pieces for the shelves and had Home Depot cut the rest)

Optional Supplies:

  • Baskets (amazon)
  • Kid hangers (tjmaxx is great for these or here)

When we bought the board, we brought a piece of paper with our measurements and a pencil so we could mark the measurements on the plywood. This made it alot easier on the guy we asked to cut our board at Home Depot (they cut for free).

Here is what how we measured it out to make the most use of our 4 ft by 8 ft plywood.

  • Two 48 in x 16 in boards (top and bottom)
  • Four 32 in x 16 in boards (sides and middle)
  • Three 16 in x 16 in boards (shelves) -they couldn’t cut those there, at least our guy couldn’t

Once we had the pieces cut and brought them home, we sanded them to give a more finished look.

To make it more sturdy, we used Kreg Jig to make pocket holes to attach all the pieces and for the dowel rod we just measured the length between the opening after it was together and secured by screws. One person just used a nail gun to attach everything. It is really up to you and how sturdy you would like it.

We used white wax to seal/protect the plywood for a natural look and smooth feel. You can definitely paint and stain it. We will be adding beatboard for backing and a 1 in thick trim around the front edges to give it a more finished look.

This was much cheaper to make on our own and it was easy too! Definitely love how accessible it is for our son and excited to see him learn to pick out his own clothes!